What Is Bug Life Cycle In Software Testing, Different Phases Of Defect Life Cycle?
Trajectus
 5 Minute read

The bug life cycle is also known as the Defect life cycle. In the Software Development Process, the bug has a life cycle. The bug should go through the life cycle to be closed. The bug life cycle varies
depends upon the tools (Target process, Bugzilla, QC, JIRA, etc.,) used, and the process followed in the organization.
What is Defect :
Defect is nothing but some abnormal behavior in the application or software Then we can called as a Bug or Defect, We can post this defect with using some Defect Tracking or Management
tools like Target Process /Jira ..etc.,
Using above tools – if we found any defect then we can write text description in manner of “Steps to Reproduce” for the defect along with Attached screenshot or Video for easily understand to the developer
for reproduce the same.
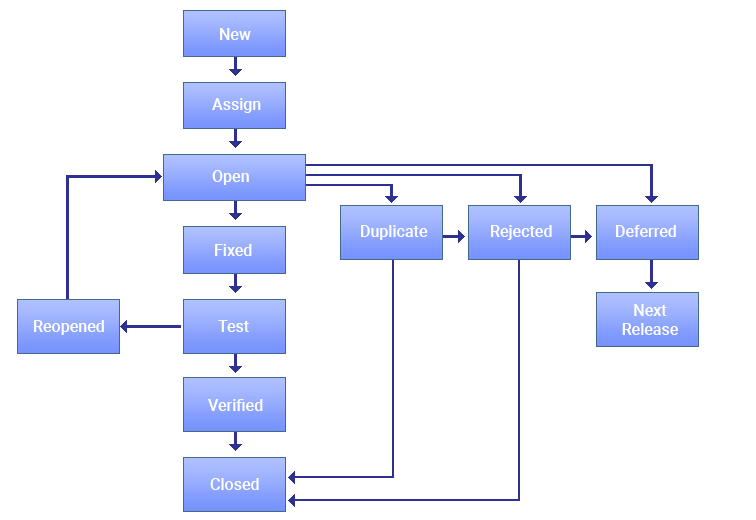
Defect Life Cycle States
The different states of a bug in the bug life cycle are as follows :
New
When a tester finds a new defect. He should provide a proper Defect document to the Development team to reproduce and fix the defect. In this state, the status of the defect posted by the tester is “New”
Assigned
Defects that are in the status of “New” will be approved (if valid) and assigned to the development team by Test Lead/Project Lead/Project Manager. Once the defect is assigned then the status of the bug changes to
“Assigned”
Open
The development team starts analyzing and works on the defect fix.
Fixed
When a developer makes the necessary code change and verifies the change, then the status of the bug will be changed as “Fixed” and the bug is passed to the testing team.
Test
If the status is “Test”, it means the defect is fixed and ready to do test whether it is fixed or not.
Verified
The tester re-tests the bug after it got fixed by the developer. If there is no bug detected in the software, then the bug is fixed, and the status assigned is “verified”
Closed
After verified the fix, if the bug is no longer exits then the status of the bug will be assigned as “Closed”
Reopen
If the defect remains the same after the retest, then the tester posts the defect using the defect retesting document and changes the status to “Reopen” Again the bug goes through the life cycle to be fixed.
Duplicate
If the defect is repeated twice or the defect corresponds to the same concept of the bug, the status is changed to “duplicate” by the development team.
Deferred
In some cases, the Project Manager/Lead may set the bug status as deferred.
- If the bug found during the end of the release and the bug is minor or not important to fix immediately.
- If the bug is not related to the current build.
- If it is expected to get fixed in the next release.
The customer is thinking to change the requirement.
In such cases the status will be changed as “deferred” and it will be fixed in the next release.
Rejected
If the system is working according to specifications and the bug is just due to some misinterpretation (such as referring to old requirements or extra features) then the Team lead or developers can mark such bugs as
“Rejected”
Some other statuses are :
Technology not supporting, Root of the product issue, Cost of fixing a bug is more.
Platform mismatch, improper defect document, data mismatch, build mismatch, inconsistent defects.
If a developer is unable to reproduce the bug as per the steps provided by a tester, then the developer can change the status as “Need more information’. In this case, the tester needs to add detailed reproducing
steps and assign bugs back to the development team for a fix. This won’t happen if the tester writes a good defect document.
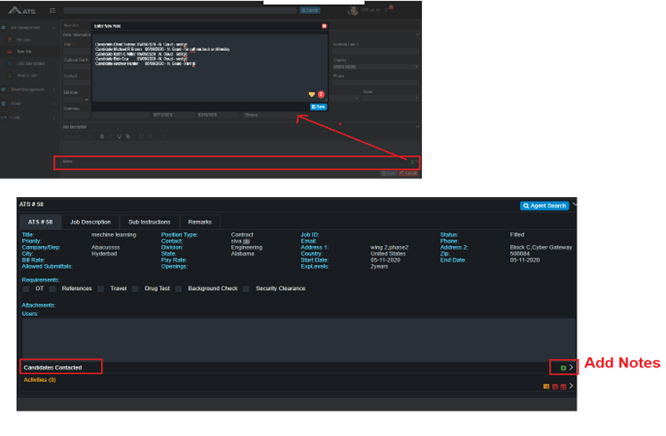
ATS Url : http://atsin.trajectus.com
Device : Window 8/10 – Browser : Chrome, Ver - 94.0.396.10
- Login to ATS using valid credentials
- Go to 'New Job' link under 'Job Management' module
- Enter all Mandatory details and add some information in 'Notes' field and save it
- Notes will be saved for specific Job
- Go to Job Profile under 'My Job' section
- Now Observe Notes for the Job (which is already added some information)
Actual Result :
'Notes’ information is missing from the My Job section.
Expected Result :
Should display Notes information text box for specific Job.
Note :
Please find the attached screenshot for more information.

THE AUTHOR
Ch SivaRamakrishna
Software Test Engineer